Everything discussed on this page is also covered in the following video tutorials:
Initialization
Here are the steps required to initialize the plugin:
- make sure the Runtime Level Design package exists inside your project;
- in the top toolbar, click on Tools->Runtime Level Design->Initialize as shown in the image below:

At this point, your hierarchy should look something like in the following image:
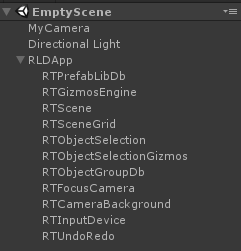
Your hierarchy may differ of course if you have other objects in the scene. In this example, an empty scene was used which contains a camera and a directional light. The important thing to note is that the hierarchy view should contain the RLDApp hierarchy shown in the above image.
Under normal circumstances, this is all you need to do. However, there is an additional step which is required if your scene doesn't contain a camera tagged as MainCamera. In that case you need to:
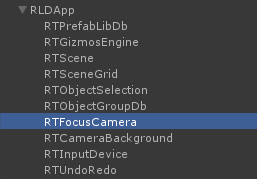
- select the RTFocusCamera object in the hierarchy view:
- if no camera is present in the scene, create a camera;
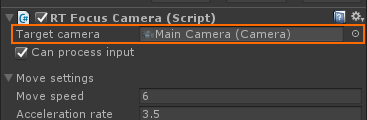
- drag and drop the camera object onto the Target camera field in the RTFocusCamera Inspector as shown in the image below:
Note
This last step is not required if your scene contains a camera tagged as MainCamera. In that case, the main camera will automatically be assigned as the target camera. You can of course specify whatever camera you wish. Just keep in mind that this is the camera that will be used to navigate and render the scene.
Dynamic Convert
RLD requires all objects in the scene to be marked as dynamic because the objects can always be moved by gizmos or other object manipulation features. Instead of having to do this manually, RLD comes with a utility called Dynamic Convert which can be used to convert all scene objects to dynamic objects. More than that, since you are most likely going to use prefabs to create more objects in the scene, the utlity also allows you to convert prefabs from a specified folder.
In order to start Dynamic Convert, first make sure the plugin has been initialized. Then, in the top toolbar, click on Tools->Runtime Level Design->Utilities->Dynamic Convert as shown in the image below:

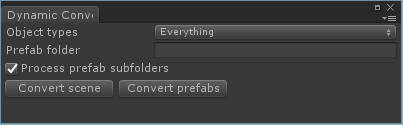
Once you've done that, the following window will appear on the screen:
Now let's talk about the controls:
- Object types - this is a mask field which allows you to specify the types of objects which can participate in the conversion process. The following object types are recognized:
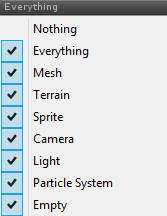
The Empty type identifies objects which don't belong to any of the other types.
-
Prefab folder - allows you to specify a folder with prefabs that you want to convert. You can write the folder path manually or you can drag and drop a folder inside the text field and the path will be extracted automatically for you.
-
Process prefab subfolders - if this is checked, the conversion module will also convert the prefabs that reside inside subfolders. If not checked, only the prefabs which reside in the specified prefab folder will be taken into account.
-
Convert scene - traverses all objects in the scene and marks them as dynamic. Note: The object types mask will be used to decide what types of objects can be converted. For example, if you know for sure that you are not going to manipulate lights or particle systems, then you can uncheck Light and Particle System in the object type mask. In that case, lights and particle systems will be left alone.
-
Convert prefabs - same as Convert scene but it applies to the prefabs which reside inside the specified prefab folder.
Note
There is one special scenario that you have to keep in mind. It has to do with object hierarchies. When the conversion module encounters an object hierarchy, the entire hierarchy will be converted if it contains at least one object whose type is checked in the object type mask. For example, if you have a hierarchy like the one shown in the following image:
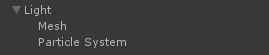
(a light object that has 2 children: a mesh object and a particle system object)
and the object type mask look like this:
the entire hierarchy will be marked as dynamic even though lights and particle systems are not checked in the object type field. This is because the Mesh type is checked and a mesh is present in this hierarchy.
Mesh Read/Write Access
Some of the plugin's features (such as object-to-object snap and selection grab) require access to mesh vertices. This means that all meshes that are going to be used by objects created in the scene, need to have the read access flag checked. Otherwise, reaults may be undefined when using these features with objects that use non-readable meshes.
As much as I wish to create a utility that does this automatically for you, at the moment it just doesn't seem to be possible. So this is a step that will have to be performed manually if necessary.
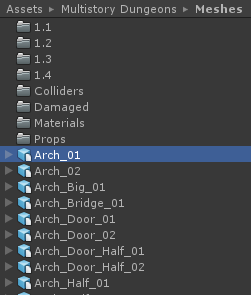
Most of the times you are probably going to use models which you bought from the store. Most of these are really nicely organized and they come with a Meshes folder. This folder contains the models as they were imported from FBX files for example. In the following image I am showing an example of a pack called Multistory Dungeons.
If you click on any mesh, the Inspector should look like in the following image:
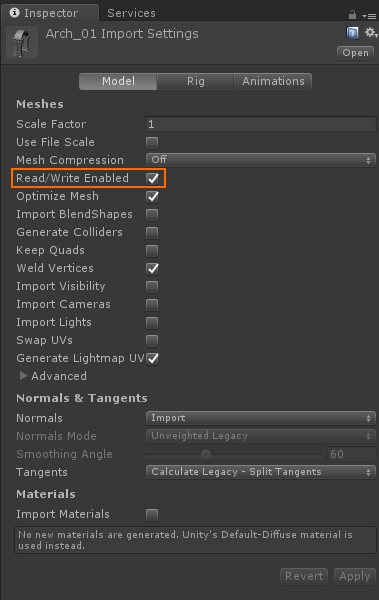
As you can see, there is a field highlighted in orange. You need to make sure that this field is checked for all meshes that you are planning on using. Luckily, you can select multiple meshes at a time and check this field for all of them at once.